回想之前写的koa工程化基础项目还是在三年前,那会使用的还是webpack4和koa2.13,现在webpack已经升级到了5,发生了比较大的更新。其中许多插件也更新了,为了适用新的项目,进行一次简单的升级和重构。为了能以后能直接使用,这次加入了脚手架的功能,这样以后就可以通过简单的命令创建koa的工程化目录了。
前言 主要分三部分:
Koa应用的工程化搭建
webpack5的配置,打包压缩优化
集成脚手架功能
Koa应用的工程化搭建 最小化安装测试 先安装koa并运行示例:
1
2
3
npm init -y npm install koa
新建index.js
1
2
3
4
5
6
7
8
9
const Koa = require ('koa' );const app = new Koa ();app.use (async (ctx) => { ctx.body = 'Hello World' ; }); app.listen (3000 );
打开浏览器:http://localhost:3000/ ,就可以访问到Hello World。
添加路由 安装koa-router
index.js
1
2
3
4
5
6
7
8
9
10
11
12
13
14
15
16
17
const Koa = require ('koa' );const Router = require ('koa-router' )const app = new Koa ();const router = new Router ();router.prefix ('/v1' ) router.get ('/' , ctx => ctx.body = 'Hello World' ; } ) router.get ('/api' , (ctx ) => { ctx.body = 'Hello api' ; }); app.use (router.routes ()).use (router.allowedMethods ()); app.listen (3000 );
路由前缀:router.prefix(‘api’),在路由前面加上,所有路由就要加上这个前缀
添加协议解析和跨域处理中间件 安装koa-body和@koa/cors
1 npm i koa-body @koa/cors -S
index.js
1
2
3
4
5
6
7
8
9
10
11
12
13
14
15
16
17
18
19
20
21
22
23
24
25
26
27
28
29
30
31
32
33
const Koa = require ('koa' );const Router = require ('koa-router' );const { koaBody } = require ('koa-body' );const cors = require ('@koa/cors' );const app = new Koa ();const router = new Router ();router.get ('/' , (ctx ) => { ctx.body = 'Hello World' ; }); router.get ('/api' , (ctx ) => { const params = ctx.request .query console .log (params); ctx.body = { data : 'this is data ' , code : 200 , params :params }; }); router.post ('/post' , (ctx ) => { let { body } = ctx.request ; console .log (body); ctx.body = { ...body, }; }); app.use (koaBody ()); app.use (cors ()); app.use (router.routes ()).use (router.allowedMethods ()); app.listen (3000 );
添加格式JSON中间件 安装koa-json
index.js
1
2
3
4
5
6
7
8
9
10
11
12
13
14
15
16
17
18
19
20
21
22
23
24
25
26
27
28
29
30
31
32
33
34
35
36
const Koa = require ('koa' );const Router = require ('koa-router' );const { koaBody } = require ('koa-body' );const cors = require ('@koa/cors' );const json = require ('koa-json' )const app = new Koa ();const router = new Router ();router.get ('/' , (ctx ) => { ctx.body = 'Hello World' ; }); router.get ('/api' , (ctx ) => { const params = ctx.request .query console .log (params); ctx.body = { data : 'this is data ' , code : 200 , params :params }; }); router.post ('/post' , (ctx ) => { let { body } = ctx.request ; console .log (body); ctx.body = { ...body, }; }); app.use (koaBody ()); app.use (cors ()); app.use (json ()) app.use (router.routes ()).use (router.allowedMethods ()); app.listen (3000 );
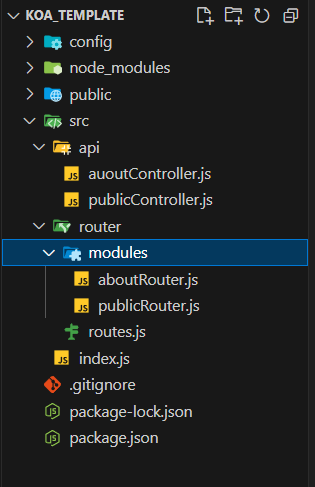
工程化目录
config这个目录放webpac的配置文件
public放静态文件
src 源码
src/api 是api核心处理逻辑代码
src/router/modules 是路由,方便处理路由的prefix前缀
src/router/routers.js 用来合并路由
src/index.js 是app的入口
路由压缩 安装koa-combine-router
1 npm i koa-combine-router -S
src/index.js
1
2
3
4
5
6
7
8
9
10
11
12
13
14
const Koa = require ('koa' );const router = require ('./router/routes' )const { koaBody } = require ('koa-body' );const cors = require ('@koa/cors' );const json = require ('koa-json' );const app = new Koa ();app.use (koaBody ()); app.use (cors ()); app.use (json ()); app.use (router ()); app.listen (3000 );
src\router\routes.js
1
2
3
4
5
6
7
const combineRouters = require ('koa-combine-routers' );const aboutRouter = require ('./modules/aboutRouter' )const publicRouter = require ('./modules/publicRouter' );module .exports = combineRouters (aboutRouter, publicRouter);
src\router\modules\aboutRouter.js
1
2
3
4
5
6
7
const Router = require ('koa-router' );const about = require ('../../api/auoutController' )const router = new Router ();router.get ('/about' , about); module .exports = router;
src\router\modules\publicRouter.js
1
2
3
4
5
6
7
8
const Router = require ('koa-router' );const public = require ('../../api/publicController' );const router = new Router ();router.get ('/' , public); module .exports = router;
src\api\auout\Controller.js
1
2
3
4
5
6
module .exports = function (ctx ) { ctx.body = { data : 'hello,World,this is auoutController api' , code : 200 , }; };
src\api\auout\publicController.js
1
2
3
4
5
6
module .exports = function (ctx ) { ctx.body = { data :'hello,World' , code :200 }; }
安装koa-helmet
src/index.js
1
2
3
4
5
6
7
8
9
10
11
12
13
14
15
16
17
const Koa = require('koa'); const router = require('./router/routes') const { koaBody } = require('koa-body'); const cors = require('@koa/cors'); const json = require('koa-json'); const helmet = require('koa-helmet'); const app = new Koa(); // 中间件 app.use(koaBody()); app.use(cors()); app.use(json()); app.use(helmet()); app.use(router()); // 监听3000端口 app.listen(3000);
静态资源处理 安装koa-helmet
src/index.js
1
2
3
4
5
6
7
8
9
10
11
12
13
14
15
16
17
18
19
const Koa = require ('koa' );const router = require ('./router/routes' )const { koaBody } = require ('koa-body' );const cors = require ('@koa/cors' );const json = require ('koa-json' );const helmet = require ('koa-helmet' );const statics = require ('koa-static' )const path = require ('path' )const app = new Koa ();app.use (koaBody ()); app.use (cors ()); app.use (json ()); app.use (helmet ()); app.use (statics (path.join (__dirname, '../public' ))); app.use (router ()); app.listen (3000 );
热加载 安装nodemon
package.json
1
2
3
"scripts" : { "start" : "nodemon src/index.js" } ,
webpack配置 最小化安装测试 安装webpack的相关插件:
1 npm i webpack webpack-cli clean-webpack-plugin webpack-node-externals @babel/core @babel/node babel-loader @babel/preset-env cross-env -D
webpack webpack-cli 是webpack 的核心;
clean-webpack-plugin是webpack的插件,用来清除dist目录下文件;
webpack-node-externals 是 排除掉node_modules,不做处理
@babel/core 是babel核心,用来转义ES6的
@babel/node 是babel 在node环境下使用需要用到的
babel-loader 是webpack的loader
@babel/preset-env是可以支持一些新的特性
cross-env设置环境变量
优化配置 webpack.config.js
1
2
3
4
5
6
7
8
9
10
11
12
13
14
15
16
17
18
19
20
21
22
23
24
25
26
27
28
29
30
31
32
33
const { CleanWebpackPlugin } = require ('clean-webpack-plugin' );const path = require ('path' );const nodeExclude = require ('webpack-node-externals' )const webpackconfig = { mode : 'development' , target : 'node' , entry : { server : path.join (__dirname, 'src/index.js' ), }, output : { path : path.resolve (__dirname, 'dist' ), filename : `[name].bundle.js` , }, devtool : 'eval-source-map' , module : { rules : [ { test : /\.(js|jsx)$/ , use : { loader : 'babel-loader' , }, exclude : [path.join (__dirname, './node_modules' )], }, ], }, externals : [nodeExclude ()], plugins : [new CleanWebpackPlugin ()], }; module .exports = webpackconfig;
.babelrc
1
2
3
4
5
6
7
8
9
10
11
12
{ "presets" : [ [ "@babel/preset-env" , { "targets" : { "node" : "current" } } ] ] }
package.json
1
2
3
4
5
"scripts" : { "start:es5" : "nodemon src/index.js" , "start" : "nodemon --exec babel-node src/index.js" , "bulid" : "webpack" } ,
优化配置2.0 单有一个Webpack打包还不行,线上和本地运行的环境不同,打包应该也不一样,所以这里需要区分线上和本地运行的环境
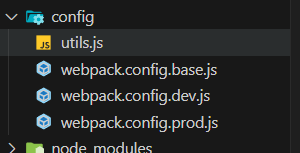
config文件夹下创建四个文件:
安装webpack merge:合并webpack
安装terser-webpack-plugin,压缩代码
1 npm i webpack-merge terser-webpack-plugin -D
config\webpack.config.base.js
1
2
3
4
5
6
7
8
9
10
11
12
13
14
15
16
17
18
19
20
21
22
23
24
25
26
27
28
29
30
31
32
33
34
35
36
37
38
39
40
41
42
43
44
45
46
47
48
49
50
const { CleanWebpackPlugin } = require ('clean-webpack-plugin' );const path = require ('path' );const webpack = require ('webpack' );const nodeExclude = require ('webpack-node-externals' );const utils = require ('./utils' );const webpackconfig = { target : 'node' , entry : { server : path.join (utils.APP_PATH , 'index.js' ), }, output : { path : utils.DIST_PATH , filename : `[name].bundle.js` , }, optimization : { nodeEnv : false , }, module : { rules : [ { test : /\.(js|jsx)$/ , use : { loader : 'babel-loader' , }, exclude : [path.join (__dirname, './node_modules' )], }, ], }, externals : [nodeExclude ()], plugins : [ new CleanWebpackPlugin (), new webpack.DefinePlugin ({ 'process.env' : { NODE_ENV : process.env .NODE_ENV === 'production' || process.env .NODE_ENV === 'prod' ? "'production'" : "'development'" , }, }), ], }; module .exports = webpackconfig;
config\webpack.config.dev.js
1
2
3
4
5
6
7
8
9
const webpackMerge = require ('webpack-merge' )const baseWbpackConfig = require ('./webpack.config.base' )const webpackConfig = webpackMerge.merge (baseWbpackConfig, { devtool : 'eval-source-map' , mode : 'development' , stats :{children :false } }); module .exports = webpackConfig;
config\webpack.config.prod.js
1
2
3
4
5
6
7
8
9
10
11
12
13
14
15
16
17
18
19
20
21
22
23
24
25
26
27
28
29
30
31
32
33
34
35
36
37
38
39
40
41
42
43
const webpackMerge = require ('webpack-merge' );const baseWbpackConfig = require ('./webpack.config.base' );const TerserPlugin = require ('terser-webpack-plugin' );const webpackConfig = webpackMerge.merge (baseWbpackConfig, { mode : 'production' , stats : { children : false }, optimization : { minimize : true , minimizer : [ new TerserPlugin ({ terserOptions : { warnings : false , compress : { warnings : false , drop_console : false , dead_code : true , drop_debugger : true , }, output : { comments : false , beautify : false , }, mangle : true , }, parallel : true , }), ], splitChunks : { cacheGroups : { commons : { name : 'commons' , chunks : 'initial' , minChunks : 3 , enforce : true , }, }, }, }, }); module .exports = webpackConfig;
config\utils.js
1
2
3
4
5
6
7
const path = require ('path' );exports .resolve = function resolve (dir ) { return path.join (__dirname, '..' , dir); }; exports .APP_PATH = exports .resolve ('src' );exports .DIST_PATH = exports .resolve ('dist' );
优化配置3.0 webpack优化完之后,还需要优化koa应用。
整合中间件:
安装koa-compose
src\index.js
1
2
3
4
5
6
7
8
9
10
11
12
13
14
15
16
17
18
19
20
21
22
23
24
25
import Koa from 'koa' import router from './router/routes' ;import {koaBody }from 'koa-body' import cors from '@koa/cors' import json from 'koa-json' import helmet from 'koa-helmet' import statics from 'koa-static' import path from 'path' import compose from 'koa-compose' ;const app = new Koa ();const middleware = compose ([ koaBody (), cors (), json (), helmet (), statics (path.join (__dirname, '../public' )), ]); app.use (middleware); app.use (router ()); app.listen (3000 );
生产模式下压缩中间件:
安装koa-compress
使用:src\index.js
1
2
3
4
5
6
7
8
9
10
11
12
13
14
15
16
17
18
19
20
21
22
23
24
25
26
27
28
29
30
31
32
33
34
35
36
37
38
39
import Koa from 'koa' import router from './router/routes' ;import {koaBody }from 'koa-body' import cors from '@koa/cors' import json from 'koa-json' import helmet from 'koa-helmet' import statics from 'koa-static' import path from 'path' import compose from 'koa-compose' ;import compress from 'koa-compress' const app = new Koa ();const isDevMode = process.env .NODE_ENV === 'production' ? false : true const middleware = compose ([ koaBody (), cors (), json (), helmet (), statics (path.join (__dirname, '../public' )), ]); app.use (middleware); app.use (router ()); const port = !isDevMode ? '12006' : '3000' if (!isDevMode) { app.use (compress ()) } app.listen (port, () => { console .log (`The server is runing at: ${port} ` ); });
集成脚手架 最小化安装测试 再开始之前,不急着在原本的项目大动修改,先最小化测试一下可行性。
初始化项目:
接下来下载几个依赖包:
chalk: 修改控制台输出内容样式,在这里可以发挥一下你的艺术细菌了~ 开源地址:https://github.com/chalk/chalk
commander:用来编写指令和处理命令行的,类比我们用过的vue init
inquirer:一个用来设计交互式命令行的工具,非常强大,类比我们在进行完vue init后他是不是会问你用不用ts啊,eslint,CSS预处理器等等,就是它完成的
ora: 就是为了美观,下载的时候会有转圈特效。开源地址:https://github.com/sindresorhus/ora
新建一个bin文件夹,在bin文件夹下新建一个文件index.js,这个文件夹就是我们脚手架的入口文件,我们可以尝试写几句代码执行一下:
1
2
#!/usr/bin/env node console .log ('hello' )
运行node ./bin/index.js,正常可以看到hello的字样
#!/usr/bin/env node,它的作用是当 系统看到这行时,能够沿着该路径查找node并执行,主要是为了兼容mac电脑,确保执行
完善配置 开始完善配置之前,梳理一下设计需求:
根据这个需求,我们需要能全局运行WY,在之前的基础上修改package.json文件
package.json:
1
2
3
4
"bin" : { "WY" : "bin/index.js" , "WY-init" : "bin/index-init.js" } ,
添加之后,使用npm link绑定命令,现在直接使用WY之后就可以输出hello,这里直接贴出index.js和index-init.js的代码:
index.js:
1
2
3
4
5
6
7
8
9
10
11
12
13
#!/usr/bin/env node const { program } = require ('commander' );program .version (require ('../package' ).version ) .usage ('<command> [options]' ) .command ('init' , 'generate a new project from a template' ) program.parse (process.argv )
index-init.js:
1
2
3
4
5
6
7
8
9
10
11
12
13
14
15
16
17
18
19
20
21
22
23
24
25
26
27
28
29
30
31
32
33
34
35
36
37
38
39
40
41
42
43
44
45
46
47
48
49
50
51
52
53
#!/usr/bin/env node console .log ('Hello this is Koa template' );const { program } = require ('commander' );const chalk = require ('chalk' )const ora = require ('ora' )const download = require ('download-git-repo' )const tplObj = require (`${__dirname} /../template` )program .usage ('<template-name> [project-name]' ) program.parse (process.argv ) if (program.args .length < 1 ) return program.help ()let templateName = program.args [0 ]let projectName = program.args [1 ]if (!tplObj[templateName]) { console .log (chalk.red ('\n Template does not exit! \n ' )) return } if (!projectName) { console .log (chalk.red ('\n Project should not be empty! \n ' )) return } url = tplObj[templateName] console .log (chalk.white ('\n 开始初始化项目... \n' ))const spinner = ora ("Downloading..." );spinner.start (); download ( url, projectName, err => if (err) { spinner.fail (); console .log (chalk.red (`Generation failed. ${err} ` )) return } spinner.succeed (); console .log (chalk.cyan ('\n 初始化完成!' )) console .log (chalk.cyan ('\n 让我们运行项目!' )) console .log (chalk.cyan (`\n cd ${projectName} ` )) console .log (chalk.cyan ('\n npm install ' )); console .log (chalk.cyan ('\n npm run dev ' )); } )
主要使用download-git-repo去拉取我们仓库的代码,引入template.json的文件。
根目录创建:template.json
1
2
3
{ "koa" : "moewang0321/easyTpl" }
使用以下命令就可以创建初始化模板了;
下载cli为全局
初始化:
1 WY init koa paoject-name
本质原理 脚手架其实本质就是去拉取一个初始化的项目,那为什么不直接git clone就好,这就是脚手架去解决的问题,每次去初始化项目,都需要去创建项目目录,然后找到这个git链接,特别是git链接,非常麻烦,脚手架一句命令就可以初始化项目无需记住任何东西,如果项目有多个项目配置,脚手架更能提现出来,比如一个项目需要使用ts,脚手架只需要创建的时候选择就好,没用脚手架,就只能通过git链接分支下载安装。这就是为什么使用脚手架和脚手架的好处。
开源代码 脚手架:https://github.com/xiaopalu/wuyan_koacli
Koa模板:https://github.com/xiaopalu/koa_template